
How To Draw A Corner Of A Room In 2 Point Perspective is one of the first needs for scenic designer sketching out ideas. In this video I show the basics to draw a room in two point perspective with a doorway in a wall and I also add some furniture in 2 point perspective.
Machine Transcribed. Please forgive the typos.
[00:00:09.320]
Let’s start with the horizon line going across the middle of our paper and find the center right about slightly off center right about there myself, a little vertical line is going to be the back corner of a room use nice wide two point vanishing point level, this vantage point one and vanishing point, too, just to keep track of things. Now, from this side would make this relatively fine. But I’m not going to go overboard. Just draw. Reference line that way.
[00:00:53.980]
Take a reference line this way. So established my first two lines, vertical line over here, as you can see, I’m not using a straight edge or parallel rule for my lines. This is just a rough sketch. But I want to lay in my guidelines, my ruler, just so that I can be clear for this video marker right there. And we go and this is the top and bottom of the lines I’m going to use come out like.
[00:01:27.330]
So that’s a little taller than I had planned at that line. This one here. There we go. So we have a corner here and I saw a vertical line right here. There we go. So this is a scenery, this is a wall of flats for sat on a stage. So I’m going to make these free-standing I’m going to add some depth to this wall over here. So it’s like so reference lines. Now, I’ll add a vertical line parallel to the other one.
[00:02:12.510]
So this is very so a little bit of thickness, a little bit to reveal so and see that this is going to be a thick wall, it’s got some thickness to it or a doorway right about here. Put a vertical line here and go above the the horizon line because the horizon line is where our our eyes are. And this needs to be taller than our our eyes because doors are usually taller than we are. And we’re looking at it as if we’re standing at relatively the same height as the floor here.
[00:02:47.880]
So I do that. There’s that line. It’s going all the back. But I don’t need to draw the whole thing. I just need a reference. And so there is the height there. So now we have this this drawing here of this wall and you have this some thickness, just like the wall has thickness over here. The door is also going to need to have thickness that would make any sense. So there’s the top of the door.
[00:03:12.090]
And, you know, the line is a lot less drastic than this one, but it’s still in perspective. It’s down here also on e-commerce going up to that vanishing point. So there’s that height right there, but it’s not working out to the top here.
[00:03:39.580]
OK, so we’ve established that I’m going to try and do the rest relatively free hand because I’m not looking to be that exact with this drawing. So here is I’m going to put a picture frame on this wall and this goes above the horizon line here and then below it here goes like this. So we have to draw up a reference line going back approximately to our vanishing point. We have vertical line, there is a picture frame now in this other room, the wall of the room is here.
[00:04:17.230]
You know, let me fill this in right here. We’ll get this. Thickness here. So there’s that wall here. This wall is going to have thickness going back and here’s the bottom of the wall where it meets the floor and the other room. We’re also going to the bottom of the wall where it meets the floor along the same line because it’s an extension of the same of the same apartment, let’s say, or the same house. And here’s where the ceiling meets.
[00:04:46.630]
So we have a little. So we’ve got the other room. We’ve got the ceiling marker at the top of the door. I’m not going to get too dark because I might want to put stuff in front of here, but here we have so we have a picture frame. We put a person in here. So be a portrait of an Bessie or Uncle Buford. There’s a picture frame and we can even give it a little bit of perspective decoration around the edge, the sides of it, and you notice that they stole the diagonal lines to go all the way over here to a financial point.
[00:05:37.960]
How bad was that? We can fix it up a little bit. The bottom was pretty close. It’s perfectly OK to do rough sketches in the beginning and then fix it up a little bit with your ruler later on. So it looks more accurate.
[00:06:05.890]
So now back to the other room. I want to make this room, this wall, a little shallower in here. So we see another wall in the race this year.
[00:06:18.610]
Do a vertical line. Right about there and then we’re going to add a floor. They’re. And in the other room, we can even add a window into this wall, once had a window into this wall here and we’re not going to see the whole window because it was talking behind that wall there. And we’ll put a million here and a little bit of a reveal because there’s some thickness to that wall as illustrated over here. It’s a little over the top and bottom thickness of the mullion here halfway through and we’ve established is more than halfway through and we’ve established that the window is there.
[00:07:21.150]
So the window in this room would be approximately the same height. So we’re going to fix up this a little bit. And this is like I said, it’s a rough one. I’m sort of combining rough and refinement at the same time on your rough sketches, especially in the beginning, you just need to establish that you want a window. I’m just putting it so that I don’t look too much like I don’t know what I’m doing. So here we’re making a nice big window, actually make it to windows, because with this mold in the middle, it makes it look like it’s a double hung window.
[00:07:55.030]
So we’ll do it one bit, that one. And this one is going to appear a little bit wider because it’s in perspective. And then we’ll address this stuff in the middle. And there we go. So here is a volume for this window, along with a little bit of thickness. Since we’re looking at it from an angle, we wouldn’t see any of the thickness on this side of the window just on this side of the window, and then we have our moissanite right there established by the fact that is that high along vanishing point line, the horizon line looks a little off center here.
[00:08:45.850]
So obviously, it’s like I said, it’s a rough sketch. So will cheat a little bit, make that a little bit higher, a little bit thicker, then we go for those in front of the window. I’m going to stick cabinet of some sort, maybe a nice big chest of drawers and it’s going to go back towards that direction. And it’s pretty easy to draw things if you draw a box first. So we’re going to try to make this a nice box and then two point perspective, they come back.
[00:09:17.560]
So it’s going to come out from the wall. This is marking that this is against the wall because it’s even with the floor where the wall meets the floor. So we’ve got to come out from the wall a little bit in perspective and we’ll make it this long to that marker so we can come out from the wall there and then down to the floor. We need to come out again. Change outlined the direction a little bit. There we go.
[00:09:47.760]
Now we can do a vertical line. We’re establishing that it’s coming out this fast and now this is our boundary line going this way. And we need a line here and wherever it crosses, it’s all we got that was pretty good. Wherever crosses this line, that’s where that stops and that’s one where of this goes down to it stops at this reference line. So here is our box that we’re now going to put in a chest of drawers and let’s say we want three drawers.
[00:10:22.720]
We’re going to divide this into three. So there’s are that I should point reference line. There’s the next one. I don’t make it a little bit thicker and it’d be awfully wide draw. So we’ll break it up into a three set. They are. Now, there’s a technique for finding the center of this. Let me do that real quick. If you take a line across the front. And then another one this way across the front, from corner to corner.
[00:10:57.890]
These are not reference lines. They’re just they’re not going to the vanishing points. They’re not part of the drawing. They’re simply defined where that cross criss cross point is. That is the center of the cabinet. But you see how it looks off center. This space looks smaller in perspective. It would look smaller, but that’s the middle. So we’ll make this a six door cabinet and there’s the line to break up the center. So these are even and we’ll make them double draw, double handle drawers.
[00:11:31.350]
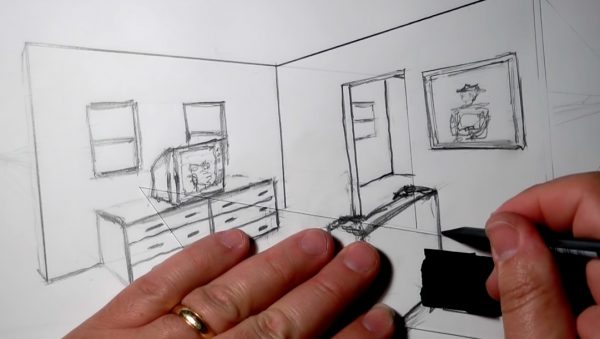
And I’m doing this by I we could also figure out where the center of that is and where the center is, that is to make the exact placement of these handles. But like I said, this is a rough sketch of beef up the top a little bit, make a little bit thicker, a little more character. I go, let’s place let’s put a television on top of this. Vertical line back there and falls and again from here, the slide is going to go back to they’re going to make an older television with a big tube.
[00:12:21.300]
Free of the inside, get rid of the window because blocking the window. And this is one of the places where we have to cheat from the rule that in two point perspective you have vertical lines and then everything else, because the vanishing point, because this curved line back here is not actually part of a two point perspective. So we’re sort of guessing there is a technique for that. But I’m not covering that here. So here’s the TV front to face the side, and then you’ve got what’s called the bezzle, which is that frame around the two, which would be in perspective with a little curved corners and then maybe some control knobs and a speaker.
[00:13:12.220]
This is a TV that might be in your parents or grandparents rooms. And then we go and maybe it’s a discussion between two people there, so there’s the television now down stage here. Well, let’s put it this big armchair right here for someone watching the TV and we’ll establish it. Right about here. Someone who sits entirely too close to the TV, so put a chair as big chair now that it’s closer to us. So we’re going to draw a box.
[00:14:08.220]
To put this TV, this chair in, you know, backwards from there. So here’s the footprint of the chair on the floor. Often their. And from here comes down to if it’s going up from there, they’re. And I’m from here and about here and we all. So here’s our box, we have a close out of the box, which will become in the back of the chair and we’ll make this chart and give a curve back some legs here.
[00:15:29.780]
That way for reference lines. And about halfway up the reference line, going back like this, I mean, no harm. Reference line, the most comfortable looking chair. The chair darker and now I’m going in with a dark pencil and firming up the lines that we want to keep. Shady underneath it, and then we’ll go in and arrest them to the lines that we don’t want to keep. We’re making all these lines darker. Raise a bunch of this other stuff.
[00:17:12.900]
And then we’re going to go in and make things darker again. Straightedge for a few of these other lines. Why wait, you want the stuff closer to you to be a little darker? This is a mostly. Basically, we have a quick to point perspective sketch using boxes to make our furniture finish this off and take some black artist tape. And frame it a little bit. Presentation.